9 EDA Repository Setup
For this assignment, you will form a project team on GitHub, create a shared GitHub repository for your project, and create the basic folder and file structure within the project. Your repository will be the central place where your team collaborates on your exploratory data analysis (EDA).
9.1 Create your team and repository on GitHub
The first step is to create or join a project team and a team repository on GitHub. Your instructor has a set procedure for how to do this in a way that grants the correct viewing and editing permissions for all team members and the instructor.
-
STEP 1: one team member creates a new team
- Log into D2L and navigate to the Biostatistics course.
- Locate the Exploratory Data Analysis Group Assignment link.
- Click the link to access GitHub Classroom.
- Click the button to create a new group
- Name the group using the last names of each group member, separated by hyphens (e.g.,
merkord-broderick). - Click OK. This will create the new group and create the group repository for the EDA project.
- Copy the URL to the new group repository and continue below to clone the repository in RStudio.
-
STEP 2: other team members join the team
- Log into D2L and navigate to the Biostatistics course.
- Locate the Exploratory Data Analysis Group Assignment link.
- Click the link to access GitHub Classroom.
- Find the group your teammate created in the previous step. It should have your last name in it.
- Click Join.
- Copy the URL to the new group repository and continue below to clone the repository in RStudio.
9.2 Check your Git Setup
To continue, Git should be installed on your computer and you should have introduced yourself to Git.
See Git Setup for instructions.
9.3 Clone the EDA project repository using RStudio
Each group member should clone the EDA project repository to their computer or Posit Cloud workspace.
IMPORTANT: It is best if one team member clones the repository, makes their first Git commit, and pushes it to GitHub before the other team members clone the repository.
9.3.1 CLONE STEP 1: One team member clones the repository and makes the first commit
-
Copy the URL for the EDA project repository
- Copy the URL to the repository you created or joined in the previous step
- If you no longer see the URL on your screen, you can find your repo like this:
- Go to https://github.com or click on the GitHub logo to go to the home page
- Click the name of your team in the left navigation menu under Your teams
- Click the Repositories tab to see a list of your team’s repositories
- Click the name of your repository
- On the repo page, copy the URL from the browser or click the green Code button followed by the copy button next to the URL
-
Open RStudio
- Open RStudio on your computer, or sign in to Posit Cloud in a web browser.
-
Create RStudio Project and Clone the Repository
- Go to File > New Project > Version Control > Git
- Paste the URL into the first box
- Hit the tab key to autocomplete the second box
- Leave the directory as is, for example
~ - Click Create Project
NOTE: When you created the new project, RStudio automatically created a project file (
repo-name.Rproj) and a.gitignorefile. The addition of these two files to the new project repo is the first set of changes you need to commit to Git. -
Make your first commit
- Navigate to the Git tab in the upper right pane in RStudio
-
Stage the changes (the addition of two new files):
- Check the box next to the R project file and gitignore file
-
Commit the changes
- Click the Commit button on the Git tab
- Note: if the buttons in your Git tab do not have labels, make your RStudio window larger until the labels show up
- In the popup window, add a commit message “First commit” and click the Commit button
- Close the commit window
- Note: at this point you should see a message in your Git tab like “Your branch is ahead of ‘origin/main’ by 1 commit.”
- Click the Commit button on the Git tab
-
Push the commit to GitHub
- Click the Push button on the Git tab
- Note: you should see a small window appear with some confirmation that the commit was pushed to github. Close this window.
- Note: the message in your Git tab “Your branch is ahead of ‘origin/main’ by 1 commit.” should disappear.
- Click the Push button on the Git tab
9.3.2 CLONE STEP 2: Other team members clone the repository
After the CLONE STEP 1 is complete, each of the other team members may now clone the repository to their own computer or Posit Cloud workspace. See instructions above for how to do each step:
- Copy the URL for the EDA project repository
- Open RStudio
- Create RStudio Project and Clone the Repository
9.4 Collaboration on shared Git repositories
Moving forward, each team member may now edit files in their local repository and stage, commit, and push those changes to Github.
If another team member has pushed commits to Github, you should use the Pull button in the Git tab to pull those commits to your local.
The workflow should look something like this:
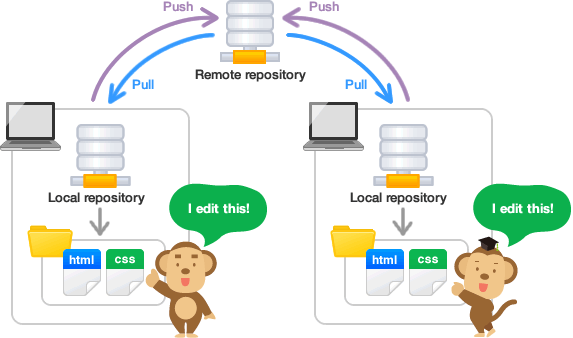
When working in a shared Git repository, it’s important to collaborate carefully to avoid conflicts and make it easy to track changes. First, always Pull the latest changes from the remote repository (green down arrow in the Git tab) before you start editing, so you have the most up-to-date version of the files. Make edits in small, focused units—try to work on one file at a time and commit each change separately with a meaningful commit message. This makes it easier to track changes and undo mistakes if necessary. Avoid editing the same files as your teammates at the same time to prevent merge conflicts, which happen when Git cannot automatically combine changes. If you do run into a merge conflict, don’t panic—Git will highlight the conflicting sections, and you can work with your teammates to resolve them. Finally, communicate with your team about what you’re working on, and push (git push) your changes frequently to keep the repository updated. Following these practices will help ensure a smooth and efficient workflow when working with Git.
9.5 Configure Project Options
After cloning, adjust your RStudio project options so that .RData files and .RHistory files are not created or opened automatically.
See Project Options for instructions.
9.6 Set Up Your Data Folder
In the Files tab in RStudio, you can click the New Folder button to create a new folder named data. This is where you will save your original data files.
In general, you should avoid storing data on Github when possible. See Organizing Data for rationale.
To tell git not to track your data files, add the data folder to your .gitignore file:
Open the
.gitignorefile by clicking on it in the Files tab in RStudio-
Type
data/on a new line at the end of the documentBe sure to end it with a slash, which tells Git its a folder
Save the changes to the file.
Stage, commit, and push the changes.
Each team member will need to create the data folder and copy their data into it. Only one person needs to update the .gitignore file.
9.7 Create Essential Files
Each group should create the following files.
Individual R Script (
your-name.R)
Each team member should create an R script to experiment with code.Quarto Report File (
eda.qmd)
This is your shared document for writing the report.-
README File (
README.md)
A README file provides a brief summary of your project. To create one, install the usethis package and run the following command in the R console:usethis::use_readme_md()Note: only one person should create the shared files (report and readme files), while each person should create their own R script.
9.8 Update your README
Your README.md file should be updated to include the following:
- Project Title
- A sentence describing the project; e.g. an expanded version of “this is an exploratory data analysis for Biostatistics”
- List of team members
- Project Abstract
- Instructions for downloading and saving the necessary data files
Edit the README.md file:
- Open the file by clicking its name in the Files tab in RStudio
- Switch to visual mode if you are not already in it (look for the visual mode button at the top of the source pane in RStudio. See the RStudio web page on Visual R Markdown for tips on editing markdown files.
- Make necessary edits to the file.
- Save the changes, then stage, commit, and push.
- Other team members should Pull the commit.
9.8.1 Example README
The entire readme should look something like this
# MacArthur and Wilson 2022 EDA Project

## An equilibrium theory of insular zoogeography*

by Robert MacArthur and E. O. Wilson

An exploratory data analysis for BIOL 275 Biostatistics at Minnesota State University Moorhead. Instructor: Chris Merkord

### Abstract

A graphical equilibrium model, balancing immigration and extinction rates of species, has been developed which appears fully consistent with the fauna-area curves and the distance effect seen in land and freshwater bird faunas of the Indo-Australian islands. The establishment of the equilibrium condition allows the development of a more precise zoogeographic theory than hitherto possible.

One new and non-obvious prediction can be made from the model which is immediately verifiable from existing data, that the number of species increases with area more rapidly on far islands than on near ones. Similarly, the number of species on large islands decreases with distance faster than does the number of species on small islands.

As groups of islands pass from the unsaturated to saturated conditions, the variance-to-mean ratio should change from unity to about one-half. When the faunal buildup reaches 90% of the equilibrium number, the extinction rate in species/year should equal 2.303 times the variance divided by the time (in years) required to reach the 90% level. The implications of this relation are discussed with reference to the Krakatau faunas, where the buildup rate is known.

A "radiation zone," in which the rate of intra-archipelagic exchange of autochthonous species approaches or exceeds extraarchipelagic immigration toward the outer limits of the taxon's range, is predicted as still another consequence of the equilibrium condition. This condition seems to be fulfilled by conventional information but cannot be rigorously tested with the existing data.

Where faunas are at or near equilibrium, it should be possible to devise indirect estimates of the actual immigration and extinction rates, as well as of the times required to reach equilibrium. It should also be possible to estimate the mean dispersal distance of propagules overseas from the zoogeographic data. Mathematical models have been constructed to these ends and certain applications suggested.

The main purpose of the paper is to express the criteria and implications of the equilibrium condition, without extending them for the present beyond the Indo-Australian bird faunas.

### Data setup

Instructions for getting the data needed to run the scripts, and how to organize it in the repository:

1. Go to https://example.com and click the "Download Data" button to download the CSV file containing the data.

2. Copy the downloaded data into a `data` folder in the repository
*Note: this is not a real abstract, it is meant only as an example for how to format your abstract.